
How to Download a .QIF File
How to Download a .QIF file so that you can send us your electronic bank statements.
Part of going paperless means that data is now exchanged in different ways and formats. The easiest way for us to receive your bank transaction information is directly into an online accounting system such as MYOB Essentials.
MYOB specifically requires a QIF file. Please be aware that this is not the same as a CSV, it will not be able to be opened. The reason we ask for this type of file is that it contains a lot more data and integrates better with the software.
The process for getting a QIF file is fairly straight forward but is slightly different depending on which bank you are with. We have provided detailed instructions below for each major bank in New Zealand. If you require further assistance to complete this please don’t hesitate to contact us.
If you have chosen to use XERO, we may request an OFX file, you can follow these same instructions and just choose OFX as the file format instead of QIF.
Once you have downloaded the files please email them back to us. If you have any questions or concerns please get in touch, we are happy to help.
Please see instructions below for each appropriate bank:
ANZ
Log in to ANZ Internet Banking.
Select the Bank Account you want data for. If you are downloading multiple QIFS you will have to do this one at a time.
Click on the “Export” button

4. Select the “Start” and “End” dates. Double-check that these are correct.
5. The most important step: for “File Format”, make sure you select “QIF (dd/mm/yyyy) – Quicken Interchange Format”.
6. The data is ready to be exported, so simply click the “Export” button
7. Your web browser will ask if you wish to “Open” or “Save” the file.
8. Save the file to your desktop and attach this file to an email to your accountant.
More information from ANZ Bank.
ASB
Log in to ASB Internet Banking.
You should see the “Balances” page by default. Click on the name of the bank account you wish to export data from (e.g. Streamline).
In the box above your transactions, enter the “From” and “To” dates for the period you want to include.
From the “Export as” dropdown menu, select the “QIF – Quicken” format option.
Your web browser may ask you if you want to “Open” or “Save” the file.
Save the file to your desktop and attach this file to an email to your accountant.

More information from ASB Bank.
BNZ
Log in to BNZ Internet Banking
Click on the name of the bank account you wish to export data from
Click on “More” at the top of the screen and then “Export transactions”
In the popup, select the “QIF” file type by clicking the dropdown arrow beside “Format”
Select the time period by clicking the dropdown arrow beside “Export”, Click “Export”
Your web browser may ask you if you want to “Open” or “Save” the file.
Save the file to your desktop and attach this file to an email to your accountant.
More information from BNZ Bank.
WESTPAC
Log on to Westpac Internet Banking.
You should see the “Accounts” page by default, but if not, click on “Accounts”.
Click on the name of the bank account you wish to export.

4. Select “Export Transactions”.
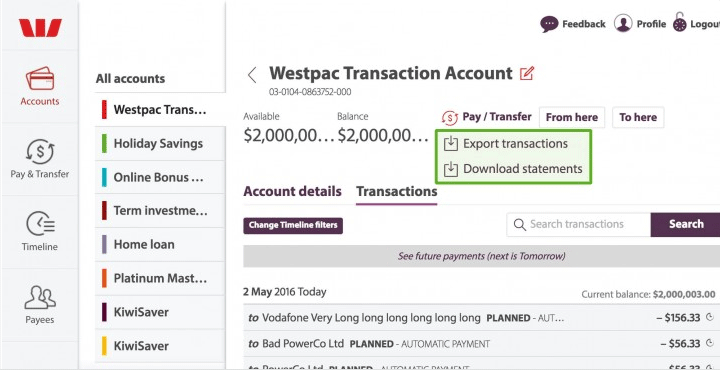
5. Enter the “From” and “To” dates for the period you want to include
6. For “Format”, select “QIF dd/mm/yyyy”.
7. Click “Export”.

8. Your web browser may ask you if you want to “Open” or “Save” the file.
9. Save the file to your desktop and attach this file to an email to your accountant.